Pebbles Giveaway!

Hey everyone! Just wanted to let you know that I have a project up on the Pebbles blog this morning.  I created a set of Holiday tags using the adorable Tree House collection and my Cricut Expression.  Head on over to the blog to check it out.  And while you're there be sure to leave a comment to be entered to win this fun Pebbles prize pack. 


Comments should be left on the Pebbles blog not mine (well of course I would love for you to leave a comment here but in order to be entered into the giveaway you need to leave a comment on the Pebbles blog).  Good luck! 

enjoy today

Hey everyone!  I just realized that I never blogged the second layout I created using the December kit from Studio Calico.  This was a really fun one to create because I used the awesome KI Memories calendar paper as my background.  I LOVE this paper and think I may have to buy it in every colors they have available.


I thought this picture of my boys was hilarious (and so typical) and the bright colors of this kit just personified the feeling of the photo for me.  I just added a few bits of paper here and there along with some pieces of American Crafts Mixtape (love this stuff), some Sassafras blossoms, and of course another one of those swirly titles by KI Memories.  Easy but I love the way this one turned out! 
Just a few more detail images ...


That's it for me today.  Short and sweet.  I've been busy the last few days trying to work ahead on some assignments so that I don't have to worry about them during Christmas break when my boys and hubby are home.  :)

a good day

Happy Monday!  I received my December Studio Calico kit on Friday and for the first time in a long time I dove right in.  Usually I open my kit, ooh and aah, and then set it aside to work on other assignments that I have on my "to do" list.  And eventually once my assignments are completed I think about going back to my kit, but by that time the next kit is due to arrive or I have more assignments that have found their way onto my list.  But this weekend I decided it was all about me.  I was going to scrap what I wanted when I wanted and everything else could wait until Monday morning.  It was oddly freeing.  And wonderful to play with paper just for me.

This is the first layout I completed with the kit and it was so much fun to create.  I've had these pics of the boys in NYC sitting on my computer for the last few months just waiting for the opportunity to use them.  When Basic Grey's Wander collection was released this past Summer CHA I knew they would meet up eventually.  Well this weekend they finally did.


Lots of fun goodies in the kit this month.  I'm particularly smitten with the American Crafts Mixtape.  Who knew it could be so much fun to add little bits of tape here and there?  I also purchased the Days of the Week stamps from Studio Calico and decided to use them right away.  Love how they play off my title.

Here are a few detail images ...


And my journaling.  I started putting this layout together before I really thought about where I would put my journaling.  Once I decided to use the Making Memories Ledger envelope I knew my journaling would end up in there.  And I decided to make a little closure for my envelope by simply punching circles, adding brads, and winding some floss around each.


I do actually have another layout to share tomorrow if I can get some good pics today.  It's pretty dreary and rainy and there's not much light so we'll see.  In any case thanks for stopping by!  :)

House of 3 Live Web Show featuring YUDU Tonight!

Just posting this message for all of the Cricut Circle members who may follow my blog...

One of our Cricut Circle sponsors, Heidi Swapp, will be demoing several of the new Provo Craft Yudu Products - flocking and glitter - on her webshow tonight! Be certain to catch Heidi’s webshow for all the fun! Heidi will be giving away a YUDU! If a Cricut Circle Member wins, the good folks at Provo Craft will be adding in the foil, flocking, glitter, glue and 70 mesh screen to the prize!

If you miss the webshow, be certain to visit the Cricut Circle Blog as we will be giving away a YUDU package that will have you set to flock the night away …

‘Tis the season! Jinger Adams, Provo Craft’s spokesperson, will be doing a giveaway on her Facebook page! Remember to ‘like’ her page and you will be eligible to win the contest!

Oh, and for those last minute gifts, enter code: blog20% to receive 20% off at creativexpress.com. (Offer code valid until 12/15/2010).

Here's the info for the House of 3 Live Web Show tonight!

gingerbread house

Happy Wednesday everyone!  Can you believe the week is halfway over?  And even crazier than that, can you believe this is my third day of blogging in a row?  ;)  Today I am sharing the last of the layouts I created with the December kit from The Story Matters.  This was a really fun layout to create because I used only one piece of patterned paper on the entire layout (well okay I used a few scraps of green patterned paper here and there but that's it! LOL) AND it's a double pager!  The colors of the Pink Paislee paper reminded me so much of these photos I took of my boys last winter.  It was the first time they really took part in the gingerbread house tradition and they had so much fun placing each piece of candy.  The yellow paper that holds my journaling is actually the reverse of the striped paper and the decorative kraft cardstock borders are included in the kit as well.  Feel free to click on the image for a closer look!


The scallop borders reminded me of the gingerbread wood trim you see on a lot of older Victorian homes so I decided to create my own little "roof" to lay on top of my title work.  I finished it all off with a little baker's twine tied through one of the handmade buttons included in the kit. 


Well that's it for me!  Thank you so much to everyone who has stopped by these last few days and left comments.  Each and every one of them put a smile on my face so thank you!  :)

holiday best

I'm back with another layout to share from my guest DT gig over at The Story Matters kit club.  As I mentioned yesterday I loved this kit - loved, loved, loved it!  One of my favorite things about the kit had to be the Basic Grey Jovial collection goodies that were included because, well, because let's face it I'm a huge Basic Grey fan. This next layout uses mostly Basic Grey with a piece here and there from some of the other patterned papers.


My boys in their holiday best - could anything be cuter?  (obviously the answer is no! LOL).  I love to mix up the size of my layouts and I thought an 8.5 x 11 canvas was the perfect fit for this one.  My favorite paper hands down is the lumberjack plaid.  It just sings of all things holiday and winter to me.  I thought the colors went perfectly with my boys' clothing so I used a large piece of it on the base of my layout.  The journaling breaks things up a bit, but the plaid is still a major player here and I love it!  Another love of mine is the micro and mini mono stickers from Basic Grey.  I buy them in multiples each time new ones are released.  They are the perfect size for longer titles and look great layered one slightly on top of the other.  Here's a detail image of my title work ...


And finally here's a detail image of some of my embellishments.  I used some punched stars here and there and layered a few of the bigger ones with the "small details" embellies from Basic Grey.


I've got one more layout to share tomorrow (and if you like double pagers you'll definitely want to come back and check it out! wink wink).  See you then!

The Story Matters December Kit

Hey all!  Happy Monday!  I hope you had a fabulous weekend.  Mine was super busy and I am slightly (okay majorly) panicking that Christmas is less than 3 weeks away.  I mean, how did that happen?  In any case I have some fun news to share that I've been keeping secret for the past few weeks.  I was asked to be the Guest Designer for The Story Matters kit club for the month of December.  I was super excited when Penny asked me to Guest DT and even more thrilled when I received the kit - loved loved loved it!  Thanks so much Penny for asking me!  :)

I created 3 layouts with the kit and will share one each day for the next 3 days (and I promise to actually post this time not like my last ... cough cough ... post ... cough cough LOL).  The very first layout I made with the kit was this one below ...

 
There were so many great patterned papers included in the kit and I really wanted to use them all somehow on a layout.  A simple grid design lends itself to using several patterns without feeling overwhelming.  Also using a neutral kraft cardstock background like I did here helps keep things from looking too hectic.  These are some of my favorite pictures of Brandon from our first major snowstorm last winter.  He loved sticking his tongue out and catching the snowflakes.  I used a bit of Studio Calico Mr. Huey's Color Mist in Calico White around my page to continue my theme and lots of punched snowflakes here and there as well.  And here's a detail image of my title work.


I will have another layout to share with you tomorrow.  In the meantime if you are interested in purchasing the kit I believe that it is still available - check out The Story Matters website for more information!

Parisian Anthology

Hey everyone!  Well everyone who is still out there reading my blog.  LOL  I've been awful lately about keeping my blog up to date.  No other excuse other than I have been really busy and in my great, big list of "to do" blogging unfortunately falls by the wayside.  I guess as they say "something's gotta give" and that something has been blogging lately.  :(

I do have a new Pink Paislee project to share today that you will hopefully enjoy.  My assignment for November was to use the new Parisian Anthology collection.  I admit I was pretty scared when I first heard this was my assignment.  The Parisian Anthology collection is very soft and vintage.  And, well, downright girly.  Something that is a little foreign for me as a mom of two boys.  But I took the challenge on and even stretched my creative legs a bit more by creating a very girly project - an altered picture frame for my new little neice Gia. 


To read all about the materials I used and my process for creating this altered frame head on over to the Pink Paislee blog.  And while you're there leave a comment telling me what you think!  I actually have another project to share tomorrow (this time using some Pebbles Inc goodies) so stop back here to check it out.  :)

Buddy

Happy Monday!  I hope you all had a fun Halloween weekend filled with lots of treats!  We live in a great neighborhood for trick or treating with lots of kids roaming the streets and my boys had a blast!  Here they are dressed as Luigi and Spongebob!  (and yes now everyone on the planet knows I let my boys watch Spongebob cartoons!  Don't hold it against me, k? LOL)


Today I have a layout featured on the Pebbles blog that I thought I would share here as well.  It features one of the newest collections from Pebbles - Cats & Dogs - so of course I had to create a layout using some of my favorite pics of our Puggle puppy, Buddy!  Feel free to click on the image for a larger view.


I LOVE this collection!  The colors, the patterns, the embellishments ... they are all so much fun!  I think my favorite new product are the Ransom ABC Stickers.  I can see myself using them over and over again.  Here I used them on my title to spell out Buddy's name - they are a nice cardstock weight and easy to pop up with dimensional adhesive.


And just another detail image of some of the new felt embellishments from pebbles.  These are adorable and there are a set for Cats and a set for Dogs!


That's all for me today.  Head on over to the Pebbles blog all week long to see what some of our other design team members have created with this adorable new collection.  And if you would like to add this collection to your stash you'll definitely want to be sure to visit on Friday (hint hint).  Thanks for stopping by!

Pebbles Layout

Happy Monday!  Normally I'm not much of a Monday person but I am just happy I made it through the weekend.  Whew - was it a busy one!  I traveled to Valley Forge, PA on Saturday for a Cricut Meet Up hosted by Provo Craft and then stuck around to help out at the Creating Keepsakes Scrap N Play event.  I always love meeting people in person that share the same passion for this hobby that I do and this weekend was no different.  Thank you to everyone that I met for being so sweet! 

This week on the Pebbles blog is all about snips & snails and puppy dog tails.  In other words we are celebrating one of our newest collections ... New Arrival Boy!  This is such an adorable collection - the colors are classic baby boy but the mixture of embellishments definitely gives it a modern spin.  I chose to do a layout introducing my newest nephew Kian.


Isn't he just a doll?  I took this picture of him when he was just 5 days old.  I love sleeping baby pics!  I used the New Arrival Boy rub ons to create a cardstock tag giving the details of his birth date, weight, etc. 


And quite possibly my favorite piece out of this new collection are these felt embellishments.  Love them! Which is probably why I put 3 of them on my layout!  LOL


Stop by the Pebbles blog to see what other projects the design team has created with this fabulous new collection all week long.  Oh and if you really want to get your hands on some of these goodies I would make sure to check out the blog on Friday ... just sayin' is all!  ;)

Abracadabra!

Wanna see me do a magic trick?  Head on over to the Scrapbook & Cards Today blog to read about how I perform a little magic using the fabulous Hocus Pocus collection by Pink Paislee.  Here's a little peek for ya ...


And as it says above "Stop by by for a spell ... Or else!"  ;)

Monochromatic Monday

As I was typing the title for this post I kinda wanted to start singing "Manic Monday" by the Bangles but refrained since a) I can't sing if my life depended on it.  Well, I CAN sing, I'm just not very good at it and b) I would seriously be dating myself.  But of course I think I've already done that now haven't I?  ;)  SO ... why don't I just share with you my Monochromatic Monday project for the Pink Paislee blog instead?

Scrapping with just one color is hard.  Well hard for me since I am a color gal at heart so this assignment was a wee bit challenging for me and you'll see I kinda sorta just.a.little.bit cheated and added in another color on my layout.  I couldn't help myself.  I just had to!


Orange with splashes of green.  Perfect colors for October and all things pumpkin picking.  Speaking of pumpkins check out my little cutie patootie in those pumpkin patch photos.  Can you believe that little dude is now my oldest Darian?  My how time flies!


Just a little detail shot of my title work.  I love using the large Weathered Wood Expressions as a mask for misting.  I actually have a whole set that I keep aside just for this purpose.  So fun.  And shamefully easy to do.

I am also the guest designer this week on one of my favorite scrapbook magazine blogs.  Check out the Scrapbook & Cards Today blog and see what magic I've been cookin' up!  :)

why "hello" there!

Hey everyone!  Just popping in with a quick post today.  I am knee deep in projects and working on a tight deadline so I haven't had much time this week to post but I did want to share this "hello" card that is up on the Pebbles blog today.  I used strips of patterned paper from the Twitterpated collection (one of my fav collections from Pebbles) along with coordinating Pebbles Chips and Journaling Stickers (the alphabet stickers are from Doodlebug Design).  I just zig zag stitched the strips to my card base, added my chipboard and stickers, and voila!  Done.  Quick and easy but oh so cute!


Okay I am off to dive head first into the pile of "to dos" that awaits me.  I will say that if you love Pebbles Candy Dots (and who doesn't?) you'll definitely want to stop by the Pebbles blog tomorrow.  Just sayin' is all.  ;)

And the winners are ...

Before I announce the winners of the Gypsy giveaway first let me say a big ol' THANK YOU!  Thank you for all of the sweet comments and the warm welcome.  I am so very excited to be a part of the Cricut Circle Blog design team and look forward to all of the exciting things this new adventure has in store.

And now without further ado here are my lucky THREE winners (yep! you read that right!  ProvoCraft has given me not one, not two, but THREE Gypsys to give away!) ...


Congratulations to my three lucky winners!  Please contact me at lghahary(at)cevant(dot)com with your full name and mailing address.  I will send your Gypsys out as soon as they arrive to me (they are in transit from ProvoCraft).  Shipping will be free for winners within the United States but I do ask that International winners contribute to the shipping costs.  Thank you again!

Coach's Gift Set

Hi everyone!  Well today I am sharing my project that I created for my first post as a Cricut Circle Blog Design Team member.  Anyone who knows me knows that we are huge football fans in the Ghahary house.  To say we are a football obsessed family might be just a tad bit of an understatement.  I think my boys learned to spell J-E-T-S before they could spell cat or dog!  ;)  Not only do we love to watch football, but my oldest son Darian loves to play football and he is lucky enough to have his Daddy as his coach.  I created this “Coach’s Gift Set” with my husband in mind.


To create the altered frame I first covered an unfinished wood frame purchased at a local craft store with green patterned paper.  I used the Sports Mania cartridge (a MUST HAVE for the sports fans out there) to cut the football and grass and popped everything up with dimensional adhesive.  Just a quick tip: the football has some pretty intricate cuts and I found that I needed to cut my image at 2 ½” using the Multi Cut feature to achieve all of the details.  I used the Varsity Letter cartridge to cut the word “COACH” and adhered my letters to a swoosh image also cut from the Sports Mania Cartridge.  A few layered stars complete the look.  Here’s a detail photo of the main part of the frame …


To create the treat container I used the flower pot image from the Cindy Loo cartridge.   I again used the Sports Mania cartridge to cut grass from my green patterned paper and adhered it to the bottom edge of my container using dimensional adhesive.  I used the Martha Stewart All Occasion Cake cartridge to create the layered star tag and the Plantin Schoolbook cartridge for the circle and “#1” sentiment.  This is such a fun and easy gift to make and can be personalized to hold your coach’s favorite treat - I happen to know my hubby loves the new pretzel M&Ms!  ;)


To create the “thank you” card I again used my trusty Sports Mania cartridge to cut the football field background block and helmet.  Is that field not the coolest or what?  Just a quick tip:  the helmet has a lot of intricate cuts and I found that I needed to cut my image at 2 ½” using the Multi Cut feature to achieve all of the details.  I added a rub on sentiment to a strip of white cardstock along with a metal brad as well as a stapled loop of ribbon in the upper left hand corner of my background block for a bit of detail.    Finally a layered star ties the card in with my other items and my coach’s gift set is complete!


Materials Used –

Cindy Loo Cartridge
Lite Varsity Letter Cartridge
Martha Stewart All Occasions Cake Art Cartridge
Martha Stewart Seasonal Cake Art Cartridge
Plantin SchoolBook Cartridge
Sports Mania Cartridge
Cardstock (Core’dinations)
Patterned Paper (Scenic Route)
Staples (Office Supply)
Brad (Making Memories)
Ribbon (Craft Supply)
Rub Ons (Stampin’ Up!)
Pen (Signo)
Frame (Darice)
Dimensional Adhesive (American Crafts)
Adhesive (American Crafts)

Altered Frame –

Cut Football using Sports Mania Cartridge
·      Shadow 2 ½” using white cardstock
·      Layer 2 ½” using dark brown cardstock
·      2 ½” using kraft cardstock

Cut Grass using Sports Mania Cartridge
·      1 ½” using dark green cardstock

Cut Swoosh using Sports Mania Cartridge
·      1 ½” using yellow cardstock

Cut “COACH” using Varsity Letter Cartridge
·      Narrow 1 ½” using white cardstock
·      Narrow Shift 1 ½” using blue cardstock

Cut Stars using Martha Stewart Seasonal Cake Cartridge
·      Shift using yellow and blue cardstock in varying sizes

Treat Container –

Cut Container using Cindy Loo Cartridge
·      5 ½” using kraft cardstock

Cut Star Tag using Martha Stewart All Occasion Cake Cartridge
·      2 ½ using blue cardstock
·      Shift 2 ½” using yellow cardstock

Cut “#1” using Plantin Schoolbook Cartridge
·      Shadow Shift ¾” <3> using dark brown cardstock
·      Shadow 1 ¼” <1> using dark brown cardstock

Cut Circle using Plantin Schoolbook Cartridge
·      1 ½” using kraft cardstock

“Thank You” Card –

Cut Football Field Background Block using Sports Mania Cartridge
·      Background 3” using dark green cardstock

Cut Football Helmet using Sports Mania Cartridge
·      2 ½” using dark brown cardstock
·      Layer 2 ½” using blue cardstock

Cut Stars using Martha Stewart Seasonal Cake Cartridge
·      Shift 2” using yellow cardstock
·      Shift 1” using blue cardstock

I just want to say thank you for all of the wonderful comments left on my blog yesterday - I loved reading each and every one of them.  There is still plenty of time to enter the giveaway so be sure to leave a comment on this post for your chance to win! 

I can finally let the cat outta the bag!

Awhile back I alluded to a new opportunity that I was presented with way back in August and lemme tell you it was hard keeping this little tid bit under wraps for so long!  I am so very excited to share that I have been asked to join the Cricut Circle Blog Design Team!

For those of you that know me you know that I LOVE my Cricut.  It is such a fun machine to use and the possibilities are just endless.  Not too long ago Provo Craft launched the Cricut Circle.  Here's a bit about the Circle for those of you that are unfamiliar ...

The Cricut Circle is Provo Craft’s affinity program.  The Circle is a place to Inspire, Educate and Create.  This program enables crafters to see Provo Craft products first, be involved in specialized focus groups and surveys, receive special pre-launch specials on select Provo Craft products, a private blog and message board for Circletes to foster a special crafting community.  Additionally, Cricut Circle members will enjoy 4 exclusive cartridges—one each quarter, instructional webinars and double reward points for purchases on Cricut.com.

The Cricut Circle is available for annual or quarterly installments. To purchase a membership to the Cricut Circle visit cricut.com.  Annual memberships are $274.99 and quarterly memberships at $79.99.


The Cricut Circle Blog will be THE place for Circle members to gain daily inspiration, participate in challenges, oh and let's not forget the giveaways!  LOL  While the Cricut Circle Blog is exclusive to Cricut Circle members the good folks at Provo Craft have decided to open it up to EVERYONE for our launch week because we want you to be able to see what all the hoopla is about!

Wanna see what I created for my first Cricut Circle Blog project?  Here's a little sneak peek to get you started ...


You'll have to stop back here tomorrow to see the full monty!  I know I'm such a tease!  LOL  How about a giveaway to make up for it?  Do you know what a Gypsy is?  All you have to do to be entered into a random drawing to win a Gypsy is follow my blog (over on the lower left sidebar) and leave a comment on this post.  I'll leave this giveaway open until midnight (EST) on Friday, October 8th and announce my winner on Saturday, October 9th!   I have not one but TWO Gypsys to give away.  Pretty cool, huh?    

Provo Craft Swarm

Hey all!  Just wanted to share some information about a swarm the good people at Provo Craft are planning for early October.  If you are a Cricut addict (like me!) you may want to check it out!  Just click on the image to make it larger to read all the details.  :)

blink?

No, you are not dreaming, hallucinating, or otherwise imagining what you are seeing.  This is actually another post from me.  Two days in a row.  How 'bout that?  ;)

Just wanted to share a layout I have up over on the Pebbles blog today.  This was a fun layout to create mostly because these pics of Darian had me giggling while I worked.  Will you look at my boy?  He was just 1.5 years old in these photos.  Such a cutie!  But quite a stinker at the same time.  If you read the journaling (you can click the image to make it bigger) you'll see that the "blink" was not something I happened to catch by chance with my camera.  Nope - this boy gave me this face every time I tried to snap a picture of him for the longest time.  Yep, he's a stinker.  LOL


Pebbles has such fun embellishments and I just love these little chip shapes from the Tree House collection.  I used my Cricut and the Create A Critter cartridge to cut the little branch for my birdie to rest on. 


Another birdie, journaling sticker, word stickers, and a fun epoxy brad complete my layout!


I am off to catch up on laundry and pick up this mess we call a house.  Football practice, apple picking, and the Jets game (woo hoo!) didn't leave much time this weekend for anything else.  Thanks so much for stopping by! 

Pink Paislee Blog

Hey everyone!  Sorry for the lack of posts on my blog lately.  I was so sure that when the boys went back to school I'd have more time, but lately it feels like there are even less hours in the day and so my poor lil' blog gets neglected.  sigh.

I did want to hop on quickly and let you know that I have a layout up over on the Pink Paislee blog today.  It is a "back to school" layout using the fabulous Old School collection.  Here's a little peek for ya ...


If you want to see the full monty and read more about my process be sure to head on over to the Pink Paislee blog and check it out. 

I am off to the Jets game today with the hubby.  Let's hope they have a better showing than they did this past Monday night especially against their division rivals, the Patriots. 

Pebbles Giveaway

Hey all!  I'm running out the door to head to a play date with the boys shortly (they had off from school yesterday and today even though school just started Tuesday - wth? LOL) but I wanted to be sure and post about a fun giveaway over on the Pebbles blog.  Be sure to stop by and enter for your chance to win some Pebbles goodies! 

More Scarlet Lime Projects to Share ...

Hey everyone!  I have another Scarlet Lime layout to share with you today.  This one uses the Frugal Fab kit for September.  It was a fun mix of products and colors and screamed "birthday layout" so that is exactly what I created with it. 

These photos of Brandon make me giggle.  That boy was serious about his birthday wish with his eyes scrunched up all tight and lips pursed.  So stinkin' cute!  I used a plain white cardstock background to really make the colors pop but splattered a few different colors of mists around to tie it all into the colors of my patterned papers.  


And just a few more images of my title and some details of my layout.  I wish I had more time to play with this particular kit because I really loved the colors and mix of product but I simply ran out of time.


I have one more layout to share tomorrow so be sure to check back then!  :)

Scarlet Lime September Reveal

Hi everyone!  Today is officially the second day of school for my boys.  They had their first day yesterday and I am happy (hesitant?) to say it went off without a hitch.  SUCH a big difference from last year when all 3 of us ended up in tears at one point or another.  Whew! 

The September Scarlet Lime gallery is up and I thought I'd share my projects over the next few days.  This will actually be my last gallery as a design team member.  I have LOVED designing for Scarlet Lime the past few months but I have had another opportunity present itself to me and I felt the need to readjust some of my commitments to make more time for this new endeavor.  I can't share anything about this new opportunity right now but will be able to in a month or so.  ;)

You've already had a glance at this layout from my bathroom tutorial (does that sound funny or what? lol) but I thought I'd share it again along with some of the detail images. 


I love this photo of Darian.  The dark fringe of his lashes is just mesmerizing (and makes this mama jealous!) and I thought they were deserving of a layout all their own.  :)


There are lots of My Mind's Eye punchouts and brads included in the main kit this month and I had a lot of fun just clustering them together on my layout.  I also used my brand new deep border punch from EK Success.  I LOVE their punches and this one is so much fun to play with.


That's all from me today.  I'll be back tomorrow with another layout to share.  Thanks for stopping by!

School Themed Paper Piecings

Hey all!  I just noticed that on the Creating Keepsakes blog today they are featuring a layout that I created for the September 2010 issue of Creating Keepsakes all about school themed accents.  For my particular layout I paper pieced not only the backpack embellishment but the pencil to hold my title as well. 

as seen in the September 2010 issue of Creating Keepsakes magazine. 
copyright creative crafts group. posted with prior permission from the publisher.

It's really fun to paper piece your own accents and much easier than you might expect.  Be sure to stop by the Creating Keepsakes blog and check out the September issue to read all about and see lots of other fabulous back to school projects and ideas!

a tutorial of sorts ...

Hey everyone!  This week is just flying by and I feel like I am still just trying to play catch up, but I am moving forward and just hoping that it all gets done.

Yesterday in my blog comments I had someone ask me how I photograph my layouts.  It's a question I've been asked a lot so I thought I would put together a quick tutorial of sorts.  Let me start by saying this is just how I personally photograph my work.  There are probably a million ways to do it that are way easier/better than mine but this is simply the way I do it and, well, it works for me.  LOL  Also just a little disclaimer that I use a Mac, and iPhoto as well as Photoshop are involved in part of my process.  If you are a PC user you will have to kind of adapt what I'm doing to whatever photo editing software you use on your computer.

Okay first things first.  You have to take your picture right?  The best place to photograph your layout is in a well lit area inside your home out of direct sunlight.  Sunlight is great but you don't want it glaring directly on your project otherwise that's all you'll get ... glare.  So you'll need to look around and find the best place to take photos in your house and mine just happens to be ... my bathroom!


Due in large part to these two windows around my tub and one big skylight in the ceiling . . .


I take all of my photos in my bathroom with the overhead lights off.  You want to avoid using artificial lights of any kind since they can add a yellowish cast to the colors in your photo and definitely DO NOT use a flash!

So next I move my bath rug out of the way and lay down just a plain piece of white foam core so I have a nice neutral background.  In most cases the background doesn't show since I crop right up to the edges of my project but sometimes when I am taking detail photos of my layout you will see part of the background and the white foam core is something nice and neutral that will not interfere with the colors in my project.  


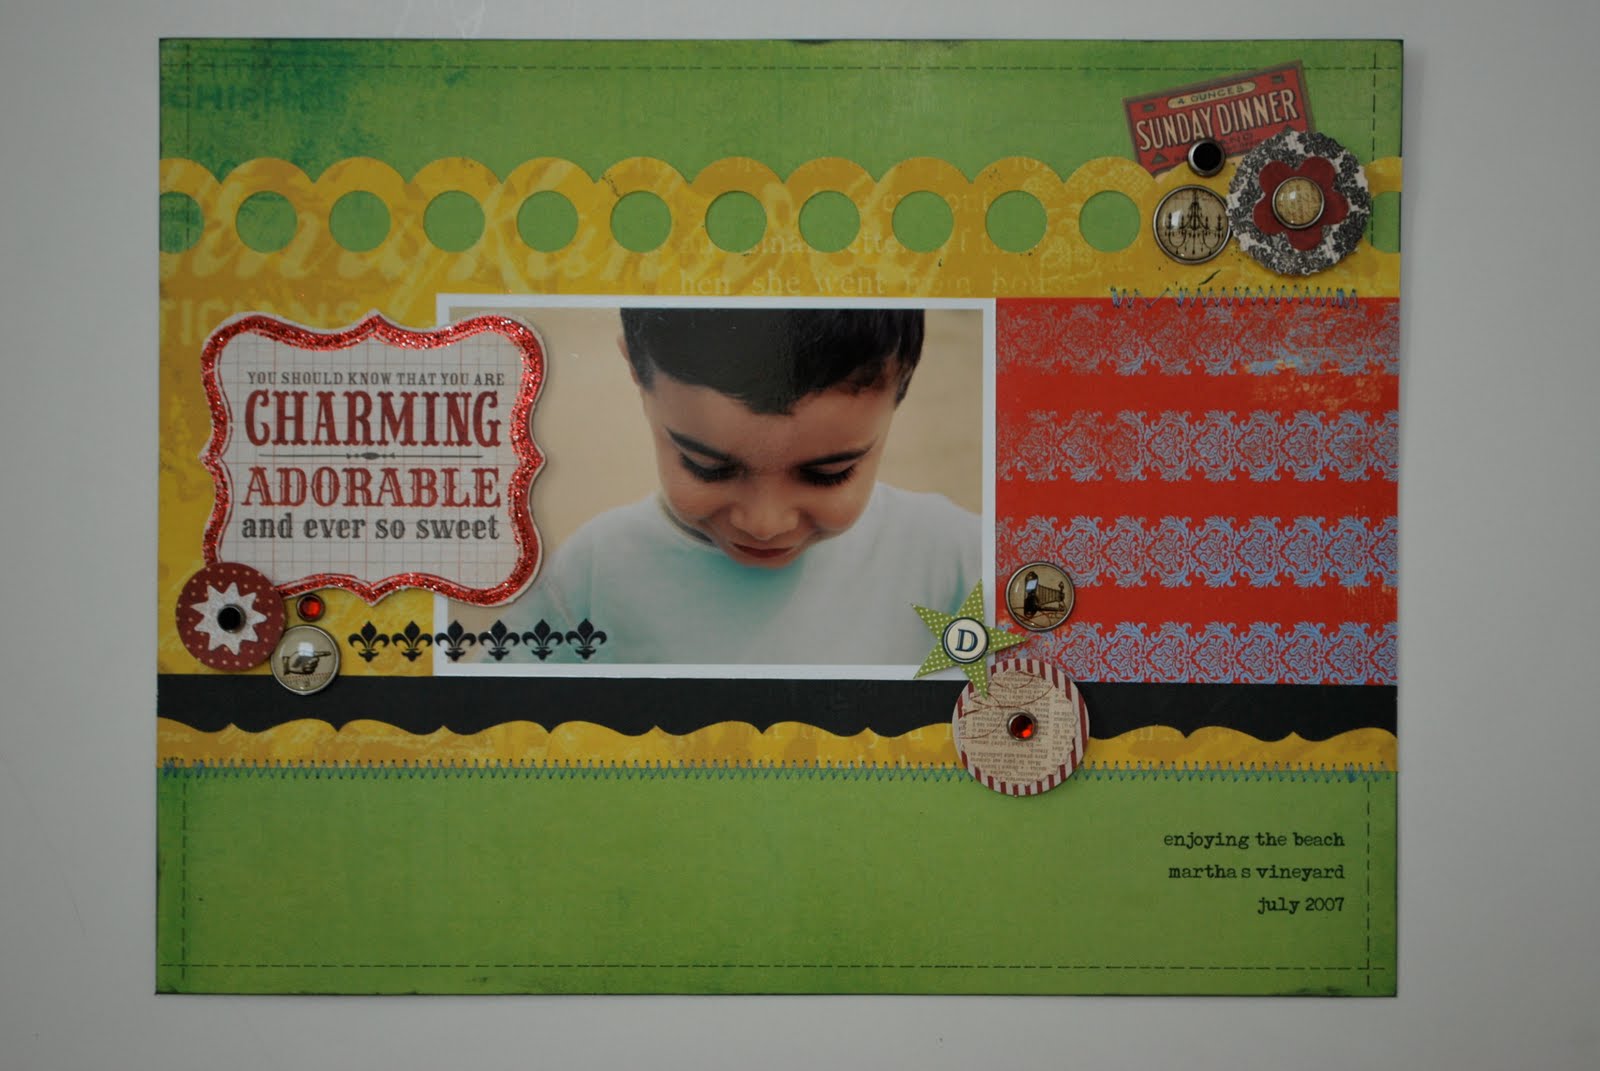
And then I simply lay my project down in the middle of the foam core, stand directly overhead, and start snapping away.  By the way the project I am using as my example is actually for my September gallery for Scarlet Lime.  Technically the gallery doesn't go live until tomorrow but since I needed to photograph my layout anyways I thought I would use it here.  So don't tell on me that I showed it early, k? 


Now I need to pause right here and define what I mean by "stand directly overhead" because this is key to getting a straight on shot of your project.  I literally put my feet on either side of my project and shoot down ensuring that my camera is parallel to my project and not tilted one way or another.  I will tell you that practice makes perfect.  When I first started shooting my layouts this way I was constantly finding that I had tilted my camera one way or another.  But now I'm pretty good at it and can get it on the first shot or two.  I do always take several photos resetting my camera in between to make sure I am getting that straight on shot.

Now that my pictures are taken I head on over to my computer and upload them.  Again since I used a Mac I upload all of my photos directly to iPhoto.  I do a few tweaks in iPhoto before finishing the process in Photoshop so if you are a PC user you will need to adapt these next steps to whatever photo management software you use.  This is what my photo looks like SOOC (straight out of camera) ...


Not bad but it definitely could use some work.  It's still a little bit crooked and of course it's a little dark.  So the first thing I do is straighten my photo using iPhoto.  This has to be one of my favorite features of iPhoto because no matter how hard I try my pictures still end up slightly crooked.  Once I've straightened my photo I then crop close to the sides.  I do not leave any background showing in my images.  This is my personal preference.  I know some people like to see a bit of the background but for me I like to crop right up to the edge of my layout.  I also use the sharpen tool in iPhoto to sharpen things up a bit.  This is what my photo looks like after I'm done with iPhoto ...


I then open up my photo in Photoshop.  It certainly doesn't look bad as it is now but it can definitely be brighter.  So the first thing I do is go to the Layers palette and adjust the levels.  For me this is the easiest way to brighten a photo and also gives me some good control since I can adjust the light, mid, and dark range tones.  Once I'm satisfied I flatten my image and then go to the File tab and select "save for web and devices."  This is what I use to resize my photos for the web.  I've been asked what size I use and I always resize to 550 pixels on the longest side at 100 quality.  This usually comes out to right under 300KB which is what most publications state is their size limit for sending attachments (saves me from having to resize any image I want to send in for a call). 


And that's about it.  I now have an image that is ready for the web and looks a little something like this ...


I hope this has helped some of you and of course if you have any specific questions regarding my process (or anything else you'd like to know) please feel free to ask.  :)